If you haven’t done so yet, you’ll need to install the Java Development Kit, also known as the JDK.
You can download it from here http://www.oracle.com/technetwork/java/javase/downloads/index.html, but make sure you select the JDK option and not the JRE (Java Runtime Environment). The JRE doesn’t include the Java Compiler and other development tools that we’ll need.
Also, make sure you download version 8 or above.
How to check I have the JDK installed?
Once you install Java, open a Terminal or Command Line window and run the following:
> java -versionOutput:
java version "1.8.0_121"
Java(TM) SE Runtime Environment (build 1.8.0_121-b13)
Java HotSpot(TM) 64-Bit Server VM (build 25.121-b13, mixed mode)
Depending on the version you have installed, the exact version number you get might be different. For a JDK version 8, the version number you get should be in the format 1.8.x_yyy.
This java executable is the one we’ll use to run Java applications later on.
We also need to check if the Java Compiler is available, for this you can run the following:
> javac -versionOutput:
javac 1.8.0_121Similar to the java case, the exact version you get will depend on the JDK you installed.
javac vs java
As mentioned before, the two main binaries from the JDK that we’ll use are javac and java. Both are used for different purposes.
The javac binary is the Java Compiler and is the program that we’ll use to compile our Java code into bytecode. Bytecode is the code/format that the java runtime (or the Java Virtual Machine) can interpret to execute our applications.
Example of how things work
For this example, we’d recommend creating an empty folder (although not required).
Inside the folder, create a new Java file called ExampleApplication.java with the following contents:
/**
 * An Example java application to show the usage of javac and java
 */
public class ExampleApplication {

    /**
     * Entry-point to our application
     */
    public static void main(String[] args) {
        System.out.println("This is an example application.");
    }

}
Don’t worry about the contents yet, we’ll cover this in the Java Beginners Course. For the time being, the important things to note here are:
-
We are creating a new class called
ExampleApplicationthat can be executed as a Java application (because it has a validmainmethod inside). -
The
System.out.printlnstatement is used to print out text to the console. -
Once we run this application, we should see a
This is an example applicationline being printed out to the console.
Open a Terminal and go to the folder above.
Visually, the 2 step process we’ll follow below is the following:
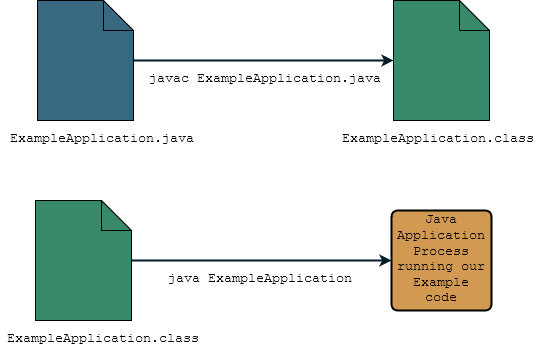
Step 1. Compiling the Java code
The first step as shown in the figure will be to use javac to compile our ExampleApplication.java code.
For this, run the following command in the terminal:
> javac ExampleApplication.javaIf everything goes ok, you should see a new file called ExampleApplication.class. This .class file is the compiled version of our ExampleApplication.java that the Java Virtual Machine can use inside a Java application.
Step 2. Running the application
Now that we have the compiled ExampleApplication.class file, we can use the java binary to run the application. Inside of the Terminal run this command:
java ExampleApplicationOutput:
This is an example application.The above is the output we expected our example code to produce.
How often will I run javac or java from a terminal?
In theory, every time you compile or run a Java application you’ll run either javac or java.
In practical terms however, Java has an ecosystem of tools that facilitate the process above and simplify this process considerably.
The example we saw above is a very simple one, however for larger applications with several Java files and required libraries, these commands get longer and more complex to manage.
Most IDEs and build systems provide functionality to basically hide this complexity from the developer and we recommend using both from the get go even if you are unfamiliar with Java.
The next sections will show a couple of options for IDEs and we’ll introduce the main build system called Gradle (https://gradle.org) that we use in most of our tutorials.
Most IDEs nowadays integrate with Gradle which makes it easier to manage your project.